x


Faculty eLearning (Blackboard) Orientation

This page provides an overview of eLearning, the official learning management system (LMS) used at Texas A&M International University. eLearning is currently hosted by Blackboard.

Quick Links: Logging into Blackboard | Blackboard Faculty Training Videos

Blackboard Faculty Orientations

Face-to-Face Orientations

Face-to-face Blackboard orientations are available throughout the year for faculty. To check the schedule, go to the OIT Professional Development website, log in with your TAMIU credentials, and self-register for a workshop. You can also schedule a one-on-one Blackboard orientation by contacting the OIT Helpdesk at (956) 326-2310 and asking for an eLearning Coordinator's assistance.

Logging into Blackboard

When you are enrolled in a course that utilizes Blackboard, you are in a virtual classroom. Your NetID (username) and password protect your data, like a key does for your locker. To log into Blackboard:

Option 1

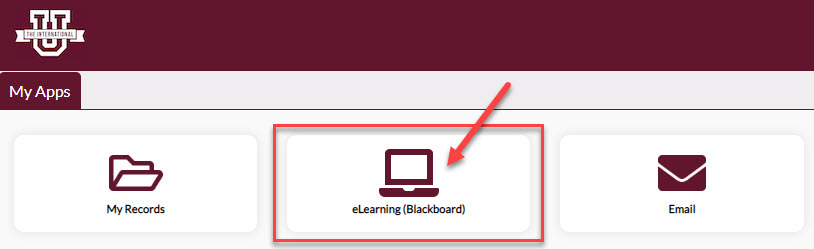
  1. Log into Uconnect (http://uconnect.tamiu.edu/), and click on the eLearning logo on the upper right hand corner.
    Arrow pointing to the eLearning button in top of Uconnect navigation.

Option 2

  1. In a web browser's address bar, type https://elearning.tamiu.edu/.
  2. Locate and click the "Log In" button.
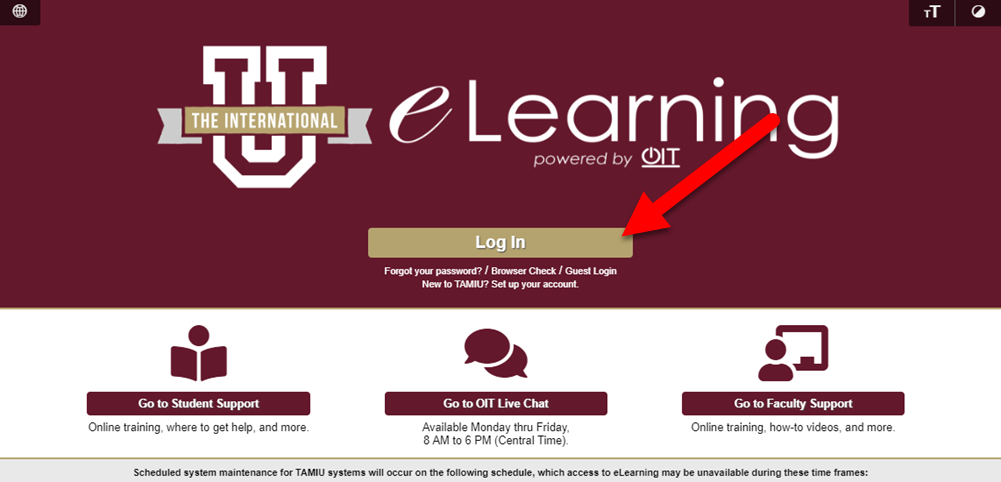
    Arrow pointing to the location of the log in here button in Blackboard.
  3. On the next page, log in with your employee credentials.(Your NetID (username) and password are the same as your University NetID and password.)

After you have successfully logged on, you will automatically be able to see links to all courses for which you are enrolled inside the Blackboard Learn system.

Blackboard Instructor Guides

The following guides are available for faculty members on some commonly asked questions:

Blackboard Faculty Training Videos by Infobase Learning Cloud

Below are a list of selected student training videos from Infobase Learning Cloud on the Blackboard Learn system. Click on a link and log in with your student NetID and password to view these videos.

Blackboard Original Videos

  • Overview of the interface - Accessible Blackboard UI: customizable, easy navigation, Quick Links, and keyboard shortcuts for user-friendly experience.
  • Global Navigation menu - Blackboard's global menu eases access to courses, links, and tools, simplifying navigation between sections and supporting seamless transitions.
  • My Institution tab - Customizable Blackboard hub: modules, tools, announcements for personalized, integrated user experience in courses and system tools.
  • Add modules to the My Institution tab - Blackboard's My Institution page enables personalized module organization, allowing users to customize, rearrange, and manage course content based on preferences.
  • Changing the settings and move modules around on the My Institution tab - Customize Blackboard's My Institution: tailor modules, content, and workflow for an efficient, personalized experience.
  • Add a new content area - Customize Blackboard courses: Add content areas for creating, organizing, and managing materials with user visibility control.
  • Add tools or modules - Blackboard's Course Navigation: Organize modules, tools, links, control visibility, and manage diverse content for students.
  • Abou the Content Collection - Versatile Blackboard Content Collection: stores, shares, customizes, and organizes resources with collaborative tools and settings.
  • My Content - Blackboard Content Collection: Sections for My, Course, Organizational, and Institution Content, including a personal virtual hard drive.
  • Course Content - Blackboard's Content Collection bookmarks: Create easy-access URLs to specific folders or items for quick navigation.
  • Bookmarks - Personalize folders in Blackboard's Content Collection: Customize and manage documents effectively with versioning options.
  • Create a folder and set options - Efficiently upload and manage files in Blackboard's Content Collection, organizing with versioning for easy access.
  • Upload a document to My Content - Week 1: Use Blackboard's Build Content to create text-based items with multimedia options, visibility controls, and view tracking.
  • Create a content item - Week 1: Create text-based assignments using Build Content, adding diverse content, attachments, and visibility choices for students.
  • Link files to a Blackboard course - Link Content Collection items in course text for direct student access to view or download documents.
  • Manage permissions content collection - Guide to course content permissions: selectively grant access, control views, and modifications based on roles.
  • Copy/move content in a content collection - Efficiently copy or move items within a content collection for seamless organization and relocation of documents between folders.
  • Add a link to an Atomic Learning tutorial - Add Atomic Learning tutorial to Blackboard: Obtain link, create web link, configure settings for student access and viewing.
  • Edit and delete an item - Directly edit Blackboard content: Modify titles, content with simple interface, confirmation message on submission.
  • Copy and move an item - Instructors reorganize Blackboard: Move or copy items between modules for improved course flow and engagement.
  • Access Adaptive release rules - Blackboard's adaptive release: Control content visibility based on criteria or rules before student access.
  • Add a Date and Membership rule - Tailor assignment access: Use Adaptive Release based on dates, student memberships for designated visibility timing.
  • Add an Adaptive Grade rule - Utilize Blackboard's Adaptive Release: Control assignment release based on grades, demonstrated with an interest survey example.
  • Set the Review Status rule - Use Blackboard's Adaptive Release: Progress to a discussion board after students mark an assignment as reviewed.
  • Assign multiple Adaptive Release rules - Enhance Blackboard with Adaptive Release: Combine date and review status for sequential content release, optimizing student learning.
  • Enable statistics tracking - Activate Blackboard's content statistics: Gather student engagement and performance data, especially useful for assessments.
  • Run a statistics tracking report - Generate Blackboard usage reports: Track student access, scores, aiding instructors in monitoring progress and engagement.
  • View user progress - Enable user progress tracking in Blackboard: Students mark items as reviewed, aiding instructors in monitoring engagement and progress.
  • Create and edit goals - In Blackboard, align learning goals: Create sets, categories, and individual goals for organization and tracking.
  • Align goals to content - Align Blackboard content with goals: Associate assignments with objectives, track and map student progress through learning outcomes.
  • Add an announcement - Craft Blackboard announcements: Utilize date restrictions, links, and message details for effective communication with students in the course.
  • Edit, delete, or reorder announcements - Manage Blackboard announcements: Edit, delete, reorder using options next to each announcement on the announcements page.
  • Send an email - Use Blackboard's email: Send messages to specific user groups, add subjects, messages, attachments, and request receipts.
  • Send and view course messages - Blackboard course messaging: Internal communication without relying on email, facilitating efficient exchange and management of messages.
  • Receive course message notifications - Blackboard course messages: Alerts on homepage and navigation bar for easy access and dismissal, clearing once reviewed.
  • Overview of the discussion board - Blackboard's Discussion Board: Integrate discussions via links or content areas, fostering student engagement through forum creation and participation.
  • Add a forum - Blackboard Discussion Board: Engage students via navigation links, content integration, fostering forum creation and participation.
  • Add a thread to a forum - Blackboard Discussion Board engagement: Create, respond to threads, fostering conversation and interaction within specific topics.
  • Reply to a post - Blackboard forums: Threaded discussions allow direct replies, fostering detailed and organized conversations within topics.
  • View and sort threads - Manage Blackboard forums: Use List View, Tree View, marking unread, expand/collapse, and filters for efficient content navigation.
  • Tag a post - Blackboard Discussion Board: Instructors tag threads for organized, themed categorization aiding student navigation.
  • Lock a thread - Control thread edits: Instructors lock Blackboard discussions for graded submissions, often allowing single edit posts.
  • Grade a post - Assign grading criteria: Blackboard lets instructors assess and grade student participation in specific discussion areas.
  • Manage student roles - Blackboard roles in discussions: Dictate permissions and access levels for managers, moderators, participants, and others.
  • Peer review of posts - Enable ratings in Blackboard: Students rate threads using a five-star system for peer reviews without direct replies.
  • Create an assignment - Create Blackboard assignments: Define instructions, due dates, grading options, and score display preferences for detailed assessment.
  • Edit and delete an assignment - What you'll learn in this training - What you'll learn in this training - Manage Blackboard assignments: Edit or delete via Options menu for flexibility in availability and settings.
  • Grade an assignment - Efficiently grade in Blackboard: Access Needs Grading, review, enter grades, attach rubrics, streamline the process, and provide detailed feedback.
  • Grade assignments anoymously - Blackboard's anonymous grading: Hide student identities for fair, unbiased evaluation, based on configured settings pre-submission.
  • Allow additional attempts - Enable multiple attempts in Blackboard: Foster iterative processes, streamline feedback and revision, enhancing learning outcomes.
  • Create a test shell - Build tests in Blackboard: Initiate shell, add details, questions, aligning assessments with course objectives.
  • Add questions to a test - The process of creating a test shell and setting up a basic structure for a test or survey in a Blackboard course.
  • Add a true/false question - Create true/false question in Blackboard assessment: Set up, choose answer, add feedback, tagging options.
  • Add a multiple answer question - Creating a true/false question: Formulate, structure, add specifics within a learning management system.
  • Add an ordering question - Create ordering question: Structure, set up within an educational platform or assessment tool.
  • Add a hot spot question - Craft Hot Spot questions: Upload images, prompt student answers within specific image areas for educational assessments.
  • Add a multiple choice question - Create multiple-choice questions: Set up, define choices, select correct response in Blackboard assessments.
  • Add a quiz bowl question - Create quiz bowl questions: Students phrase based on answers, emphasize proper wording, allow partial credit in Blackboard quizzes.
  • File response question - Reuse previous questions: Create sets in Blackboard for inclusion in new tests or assessments.
  • Create a question set - Reuse created questions: Assemble into sets for new assessments or tests in Blackboard.
  • Create a question pool and add a question to the pool - Create question pool: Assemble, reuse question groups across courses or assessments in Blackboard.
  • Create a test from the question pool - Use Blackboard's question pools: Include question sets in assessments, link to originals or copy for modifications.
  • Create a survey - Create surveys in Blackboard: Similar to tests, include Likert scales, use survey questions in tests vice versa.
  • Global question settings - Customize Blackboard question settings: Toggle off categories, keywords, instructor notes for streamlined creation.
  • Simple mode - Course editor: Format text, lists, spell check, add links—simple interface, switch for advanced capabilities.
  • Advanced mode - Blackboard's advanced editor: Text formatting, multimedia, HTML/CSS access—empowers sophisticated content creation for all.
  • Use the File Picker - Blackboard's advanced editor: Attach files, customize links for accessible, direct document access within interface.
  • Create a calendar event - Blackboard calendar: Add course events, set details, use color coding for organized, informed scheduling across courses.
  • View and filter calendars - Customize Blackboard calendar view: Day, week, month options, navigate, filter events, easily edit details for seamless management.
  • Grade from the calendar - Efficient grading in Blackboard: Calendar displays assignments, links to Grading Center for streamlined access based on instructor preferences.
  • Import your Blackboard calendar to another calendar - Sync Blackboard events: Import to Google Calendar via URL for centralized, cross-platform event management and organization.
  • New student preview mode - Blackboard's Student Preview: Experience course as student, simulate submissions, retain or delete preview data for evaluation.
  • Switch to student mode - Blackboard's Student Preview: Instructors experience courses as students, gaining valuable perspective, limited to one course.
  • View the course and forum roles - Versatile role-changing in Blackboard: Modify access levels, foster diverse roles for teaching, leadership, and support.
  • Adding in a journal - Blackboard's journal feature: Personal communication, individual projects, public discussions, customized settings for visibility and grading.
  • Accessing the Grade Center - Manage assessment data in Blackboard's Grade Center: Automatic inclusion, organization with rows, columns, customizable categories.
  • Navigating the Grade Center - Blackboard's Grade Center: Cells, rows, columns of student info, Action Bar tools, configurable appearance, navigation options.
  • Setting Grade Center views - Blackboard Grade Center modes: Interactive (inline editing) and Non-Interactive (Screen Reader mode) with accessibility features for visual impairments.
  • Adding grade columns - Customize Grade Center columns: Set format, categories, points, due dates, and calculations for class activities.
  • Sorting the Grade Center columns - Grade Center sorting: Organize data by criteria, toggle between ascending and descending orders for columns.
  • Hiding and showing columns - Simplify Grade Center: Instructors can hide specific columns, reducing clutter while maintaining visibility for students.
  • Entering and editing scores - Enter and edit scores in Grade Center: Input, save, and navigate through student entries for efficient grading.
  • Deleting or exempting a score - Delete scores, exempt grades in Grade Center: Utilize keyboard commands or interface options for efficient management.
  • Correcting test errors and re-grading - Blackboard's test regrading: Edit or delete questions, prompt system to regrade affected student attempts automatically.

Blackboard Ultra Videos

  • Overview - Welcome to Blackboard instructor training! Explore profile setup, system customization, and the creation of dynamic online courses. From content to grading, gain the essentials to confidently craft an engaging learning experience for your students.
  • Filling Out Your Profile - Personalize your Blackboard profile by adding a picture and updating your information effortlessly. Click, fill in, and done! Explore privacy settings to control who sees your profile.
  • Adjusting Your Privacy Settings - Shape your Blackboard experience by customizing privacy settings: effortlessly choose who sees your profile by selecting from options like only instructors or anyone in your courses. It's about creating a space that suits you best.
  • Adjusting Notification Settings - Tailor your Blackboard notifications: pick on-platform stream alerts and email preferences effortlessly. Curate your digital experience and adjust for the perfect balance, saving your choices when done.
  • Accessing Your Course - Explore your Blackboard courses effortlessly: click "courses," view your current or upcoming ones, and easily find and dive into your selected course.
  • Roster and Attendance - In your Blackboard course, explore the left-side menu to connect with your virtual class via "roster." Adjust roles, manage access, and view basic info with a simple click. Save changes effortlessly. The trio of dots provides extra options. For attendance, click "add attendance," make tweaks, and save. Mark attendance as present, late, absent, or excused. "Overall" gives you a history view—export it if needed. The settings icon is your go-to for additional tweaks.
  • Course Room - Enter Blackboard's course room—a dynamic virtual space for collaborative sessions. Click "join session," explore features like recording meetings and engaging with video and chat. Share content seamlessly. Similar to Skype or Google Hangouts, it's perfect for conferences or presentations. When finished, close the tab effortlessly.
  • Creating a Folder - Organize content into folders: Create, title, describe, and save. Add items by dragging and dropping onto the folder. Edit or delete using three dots.
  • Creating a Document - Add document to course: Create, choose visibility, add text or upload, edit as needed, save, and title for clarity.
  • Adding a Link - Add link to course: Float over document, click plus, create link, paste URL, add description, edit title, and save. Edit or delete using three dots.
  • Teaching Tools with LTI Connection - Incorporate LTI tool (Turnitin) in course: Click books in tools, hit plus, make visible, edit title, describe, save, and explore more LTI tools.
  • Using Content Market - Add content through Content Market: Select Content Market, choose provider, add specific content, customize title and description, and save changes. Explore other providers for more resources.
  • Upload Items - Upload information: Click plus, select upload, choose file, edit title, add description if needed, and save changes.
  • Copy Content from other Courses - Copy content from previous course: Click plus, select copy content, type course name or ID, check items, and copy selected content into the current course.
  • Adding Assignments - Add assignment: Click plus, expand assessment, choose assignment, build questions, set due date, adjust settings, add description, and save.
  • Adding a Rubric to Assignments - Add rubric to assignment: Click plus, create new assignment, set settings, choose grading rubric, create and edit rubric criteria, and save changes.
  • Creating a Group Assignment - Create group assignment: Float over border, click plus, create assignment, set due date, enable class conversations, assign groups, add content, and save.
  • Adding Assessments - Adding assessments in Blackboard: Click the plus sign, create a test, add questions (like multiple-choice or essay), set points, due date, and submission rules for a complete test setup.
  • Organizing Content - Organize course items in folders using the plus sign, drag-and-drop feature, enabling easy navigation for students.
  • Adding a Post - Creating a discussion in the board using a text editor, formatting options, and managing posts.
  • Reading and Replying - Accessing discussions, checking replies, and replying to specific posts in the course's discussions section.
  • Adjusting Discussion Settings - Adjusting post settings, displaying on the course page, and managing participant lists within discussions.
  • Make Discussion Graded - Creating a graded discussion post, setting parameters, adding a rubric, and managing grades and participation.
  • Organizing Discussions - Organizing discussions by creating folders, moving posts, and adding content within the folder interface.
  • Creating Groups - Creating group-specific discussions, assigning students to groups, and managing group-related threads within the discussion board.
  • Changing Grade Schemas - ccess the grade book, modify grading schema via settings, adjust grade range, and save changes.
  • Create Categories - Create grading categories, assign content, and view organized lists for easier comprehension in grade book.
  • Grading Submitted Content - Grade submitted content by reviewing, assigning scores, and providing feedback through the grade book interface.
  • Set up the Overall Grade - Adjust overall grade weights, percentages, and exclusions to reflect the course structure and calculate final grades.
  • Organizing and Adding Items - Quickly add and organize grade book items by setting names, visibility, due dates, points, categories, and descriptions.
  • Creating a Rubric - Create a rubric in the grade book by defining criteria and percentages, customizing descriptions for grading levels.
  • Send a Message - Compose messages in Blackboard by selecting recipients, crafting the message, and choosing email copy and reply options.
  • Read and Reply - Access messages via the envelope icon, read, reply, and delete threads using the sender's options.
  • Accessing Your Calendar - Access your calendar via the left menu, view schedule or due dates, toggle calendars using gear icon.
  • Adding Events - Click the plus sign, add event details, save to add. Edit by selecting event title, make changes, save.
  • Adding Office Hours - Use the plus sign, add repeating office hours, select days, end date, add details, and save.
  • Edit Course Schedule - Edit course schedule: select class, adjust details like dates, times, repetition, location, and save changes

Office of Information Technology
Instructional Technology & Distance Education Services
Sue and Radcliffe Killam Library (KLM) 259
Phone: 956.326.2792
Fax: 956.326.2299
E-mail: elearning@tamiu.edu